How would you help your customers when you are a zoo, or a city, or when you want to help your customers outside the walls of your building, like the Hospitality industry? “I’d use an app for that!”, I hear you say… That is an excellent idea! If only people weren’t so tired of downloading yet another app… So no, if you want to help your customers at any location, without having to download anything and have all the convenience of a Conversational User Interface, then you could use a chatbot.
A chatbot can run inside most of the popular messaging apps that people already have on their phone or as a (Progressive) Web App that doesn’t need to be downloaded or installed.
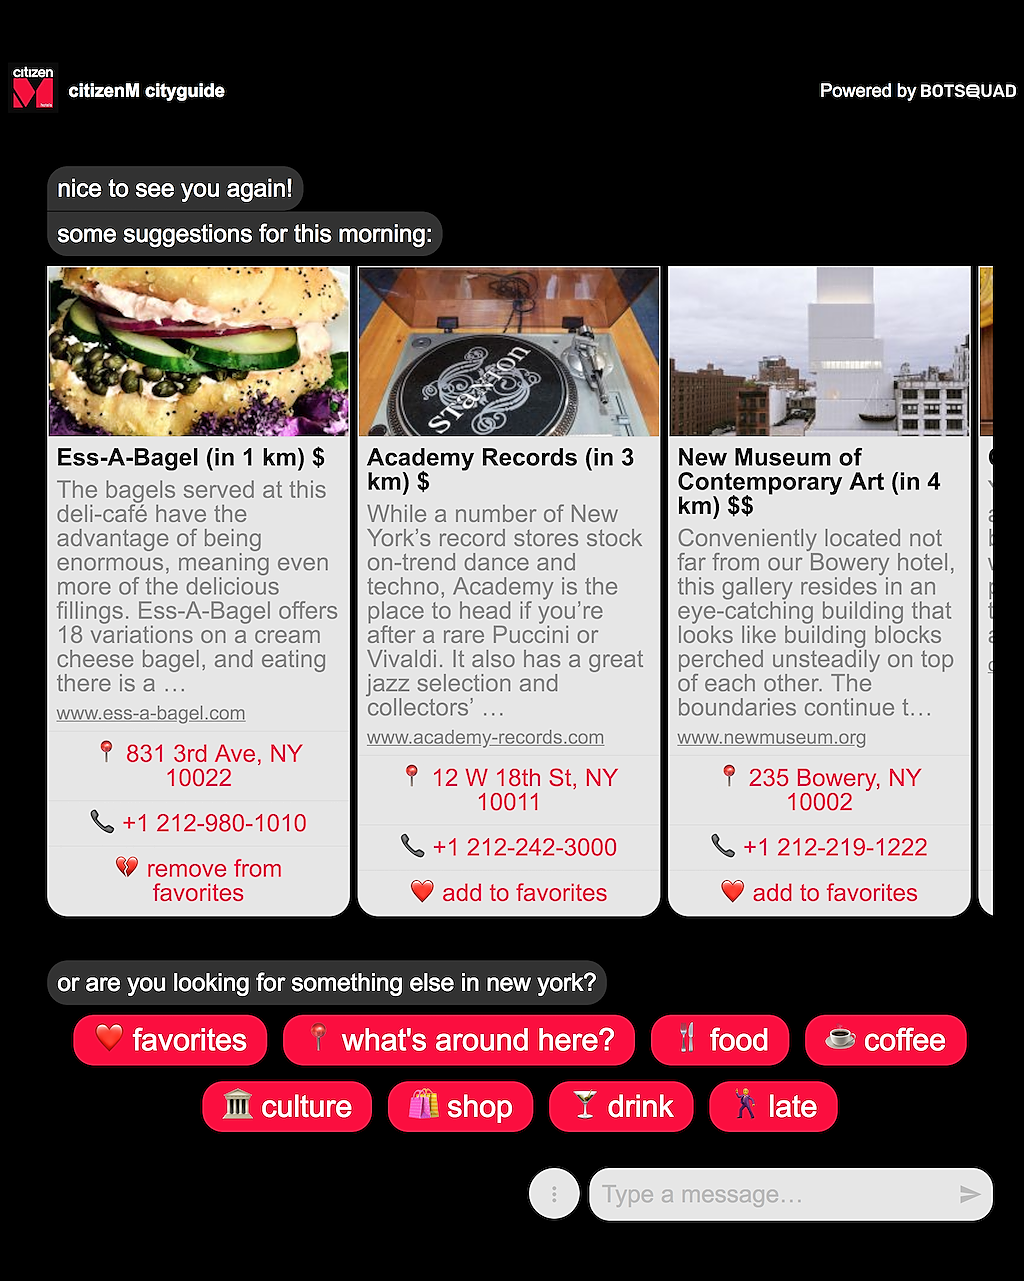
The first CityGuide example that we’ve built as an example and added for free in the Botsquad Bot Store caused quite some interesting opportunities for us. Some weeks ago we delivered an extensive version of the bot to CitizenM hotel chain, as a pilot project for their New York and Amsterdam hotels, before we will roll it out to their other locations. You can try the bot at https://go.citizenm.com or read the article here.
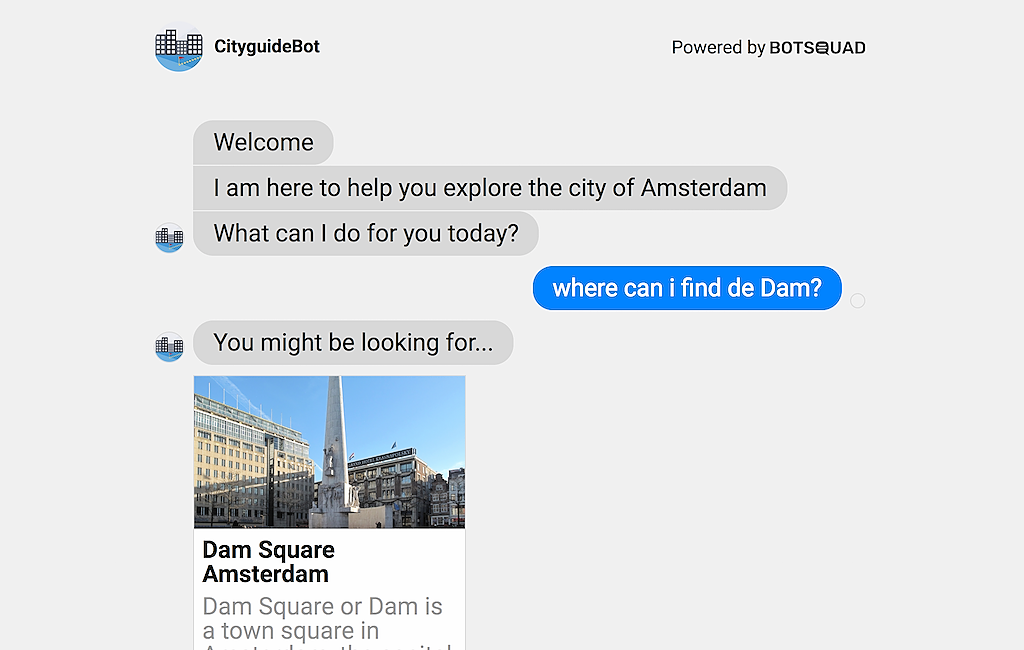
Having implemented this bot a couple of times now learned us quite a bit on the topic as well as inspired us to improve the platform with a couple of new features which I am happy to introduce to you in this article. For this purpose we’ve rewritten the CityGuideBot example in the Bot Store. You can still freely clone the bot into your own Botsquad environment and extend it to which ever your needs are. Feel free to try version 2.0 of the CityGuideBot. An impression:
In the following paragraphs I will explain exactly how this bot is built. I will start by explaining which User Intents this bot can service and on which dialogs they’ll map. Then I will explain the different intents one by one in detail and finish explaining how you can generate a Progressive Web App for this bot.
Data
But let’s start at the beginning: the data. If we are to make a CityGuideBot, this bot will need to have data about all the Points of Interest (POI’s) we care about. This list of POI’s needs to be extendible without having to change the code of the bot all the time. We can integrate to another system for this purpose but we can also have the data inside of Botsquad by using one of the data types that are supported.
We decided to go for a YAML file having the following fields: name, description, url, image and location.
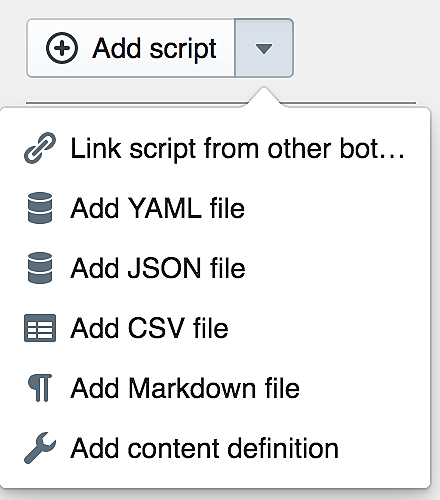
So if you are in the build part of the Botsquad Studio you can click on the arrow-down-part of the Add Script button on the left hand side to add a YAML, JSON or CSV file. In this case, choose a YAML file and paste the following data and extend it with a couple of other POI’s:
-
  name: Anne Frank House
  description: The Anne Frank House is a writer's house and...
  url: https://en.wikipedia.org/wiki/Anne_Frank_House
  image: ...
  location:
    lat: 52.375242
    lon: 4.883978
-
  name: Van Gogh Museum
  description: The Van Gogh Museum is an art museum dedicated...
  url: https://en.wikipedia.org/wiki/Van_Gogh_Museum
  image: ...
  location:
    lat: 52.358731
    lon: 4.881065
- ...
When we have stored this data as pois.yaml in Botsquad, we can now refer to this data by simply using the @pois constant.
Botsquad supports hot loading. So when you update a data file, like the pois.yaml file above and publish the bot again, all running bots will instantly have the new data available.
We can now simply traverse through this data by using for instance a repeat construct. This is actually what we did in version 1 of the CityGuide: traverse through all the POI’s, calculate distance, add it in a new collection, sort it and traverse again for displaying:
  repeat poi in @pois do
    say poi.name
  end
Not really efficient right? I’ll explain how this can be done much more efficient in a bit, but first, let’s start at the begin.
Intents & Entities
For a very basic CityGuide we will need to recognise and handle least three user intents and two entities. The user intents are:
- What’s here
- *Where is …. *
- What’s next.
The entities are: we fi
- POI search criteria, needed in the “where is…” intent
- Location, needed in the “what’s here” intent.
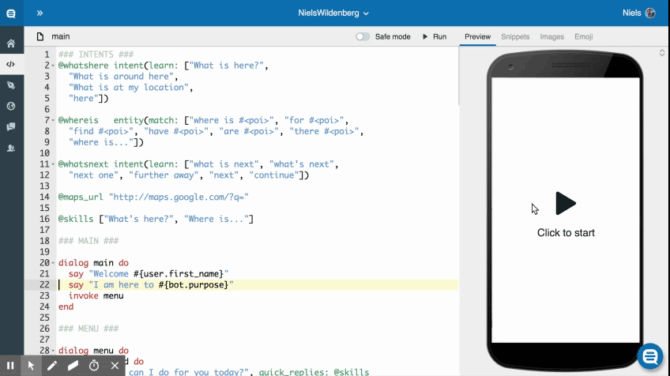
In BubbleScript we would define these intents and entities as follows:
@whatshere intent(learn: ["What is here?",
  "What is around here",
  "What is at my location",
  "here"])

@whereis   entity(match: ["where is #<poi>", "for #<poi>",
  "find #<poi>", "have #<poi>", "are #<poi>", "there #<poi>",
  "where is..."])

@whatsnext intent(learn: ["what is next", "what's next",
  "next one", "further away", "next", "continue"])
@whatshere is defining a user intent and by training a couple of variants of phrases a user might enter to convey his or her intent we train the bot to trigger in the right way. Botsquad will, under the surface use AI and Wikipedia content to extrapolate and permutate more variants of these sentences so you don’t need to provide everything yourself.
As you can see the @whereis is defined as an entity because for this intent it is very important to catch the search criteria of the user. What is it the user is looking for exactly? By using the #< … > structure we tell Botsquad where this data might be. The … part holds the attribute name we can later use to find the value of the entity the user submitted. So in our case we are looking for POI’s, so we use #<poi> as the entity attribute. This way we can refer to this attribute in the code simply by looking at entity.poi.
You will also notice that we didn’t define an entity for location. This is because location is a built-in entity that can be referred to as :location.
The @ is used to indicate global constants in BubbleScript. Intents and entities are normally defined as constant since they normally don’t change during a session. The : is used to indicate an attom, which translates to a string value that doesn’t change and therefore proove to be quite handy for built-ins.
Triggers
Now we have defined the entity and intents, we can trigger some dialogs to handle the intents. Triggers are the gateway into the Bot’s skills. They can be implemented as follows:
dialog trigger: @whatshere do
  say "find the closest poi"
end

dialog trigger: @whereis do
  say "find #{entity.poi}"
end

dialog trigger: @whatsnext do
  say "load the next poi"
end
Quick Replies help discoverability
What we now have is a very simple bot, that listens to what the user types in and tries to trigger one of the three intents. We’ve learned that the user experience of this approach is quite poor. Consider this: The bot starts, it says hi and then what? The challenge with this approach is that the user doesn’t always know what is supposed to be typed in. Or even worse, what the bot’s skills are in fact. Bots will always have a limited purpose. So what is this bot’s purpose and how can we make that clear to the user in a concise and convenient way?
By using Quick Replies we help the user by suggesting what intents the bot can service, but also make it much quicker for the user to trigger them because they don’t need to be typed in anymore…
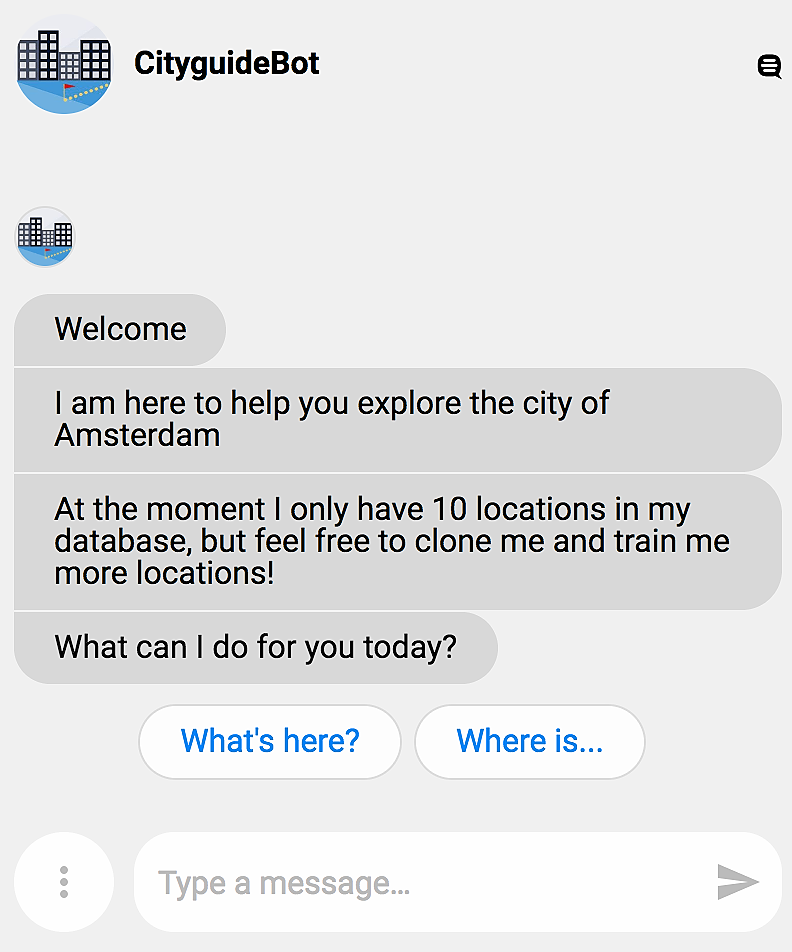
So to bring this benefit into the bot we introduce an old fashion main menu. We will ask the user “How can I help you today?” and at the same time offer a couple of quick replies. For our example it would be: “What is here” and “Where is…”. We’ll leave out the “What’s next” obviously because it doesn’t make sense before doing one of the other two first. An implementation for this menu could look like this:
dialog menu do
  say "What can i do for you?", quick_replies: ["What is here?", "Where is...?"]
end
As you notice we use a say here instead of an ask. Both are ok. Using a say keeps it simple, because whatever the user enters or selects from the quick replies will be treated as a new message coming in that needs to be handled by one of the triggers.
When we would use an ask we would catch the answer first and then throw it up on the processing stack our selves, like this:
dialog menu do
  ask "What can i do for you?", quick_replies: ["What is here?", "Where is...?"]
  invoke message: answer
end
The benefit of doing it this way however is that we have an opportunity to handle certain cases or add certain logic or data before we throw the message up for further handling, like this:
dialog menu do
  ask "What can i do for you?", quick_replies: ["What is here?", "Where is...?"]
  branch do
    answer == "What is here?" ->
      invoke what_is_here
    answer == "Where is..." ->
      invoke where_is
    true ->
      invoke message: answer
  end
end
We’ll keep the simple one for now, the one using a say.
User intent: What’s here?
So let’s start filling in the dialogs for the three intents, starting with the @whatshere intent. As we established before we only need to elicit the location entity for this intent. What is the user right now? Fortunately we are running on somebody’s (mobile) device which can easily share its GPS location with us, so we don’t need to bother about asking the user to type in an address and translate it to geo coordinates for now. The bot can simply ask for a location using an ask:
location = ask "Please share your location", expecting: [:location]
But there is also another way for users to give their location and that is by using the input controls of their Messaging App. So we need to consider two possible scenario’s in which this intent can be fired, either (1) with a location already set, or (2) without in which case we need to ask the location first.
dialog trigger: @whatshere do
  location = ask "Please share your location", expecting: [:location]
  invoke what_is_here
end

dialog __unknown_location__ do
  invoke what_is_here
end

dialog what_is_here do
  # find the nearest poi and show it
end
The unknown_location identifier can be used to capture any location pin that is being thrown and not captured separately.
Normally we would trigger on a specific location being thrown by implementing a dialog triggered by a specific location and radius using the following syntax:
dialog location: [lon: 4.893414, lat: 52.364909], radius: 3000 do
  say "Welcome in Amsterdam!"
end
But since we want to build a bot that uses dynamic data (i.e. using external data or data from a file) we need to capture any location and then build some logic to find the right POI.
So as I explained before we would previously iterate through all POI’s, calculate the distance from this POI to our location and then sort all the POI’s based on this distance so we get the closest first. This works great, but requires quite some logic we consider not to be chat specific and therefore could be abstracted away.
For this purpose, Botsquad created the MatchEngine: a library which allows us to easily filter, score and sort data in which ever way we like. So to get the POI that is closest to our location we simply build a little query and give that alongside the @pois collection to the score function. The score function will execute the query and score all items against the query. It will store this score as an additional little data map in the collection it returns called _match, having two attributes: score and distance. The score attribute holds a value in this case between 0 and 1, 1 being the closest POI and 0 being the most far away POI. The distance attribute will hold the exact distance in meters.
Score will automatically sort the result using the score attribute so we can just pick the first one in the collection to get the closest POI.
dialog what_is_here do
  query = [location: [_geo: [lat: location.lat, lon: location.lon]]]

  # sorts the pois based on their distance
  pois = score(@pois, query)

  # gets the first item from the list:
  poi = first(pois)  # in which case you won't get an error when the list is empty
  # or
  poi = pois[0]   # in which case you'll get an error when the list is empty

  say "The closest POI is..."
  say poi.name
end
Easy right?
Let’s look at the output now for a bit. You’ll agree just showing the POI name isn’t sufficient.
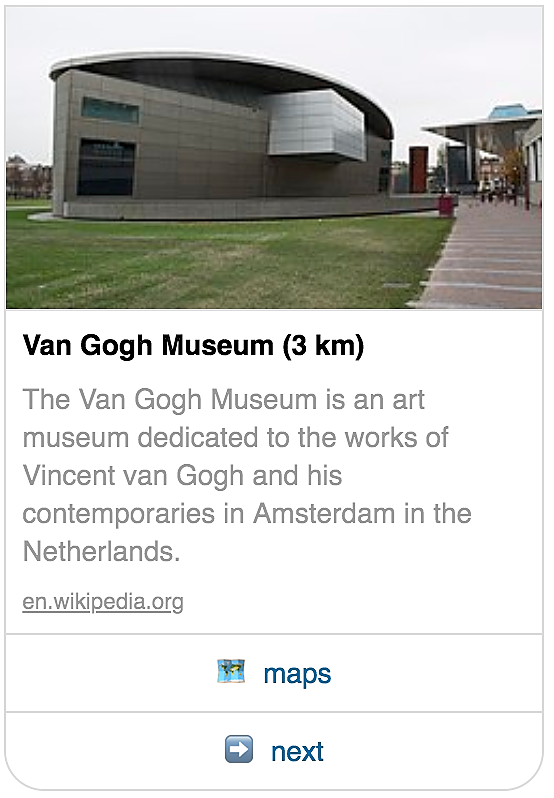
So how can we present this POI in a more friendly way, a Facebook messenger like card for example? Having an image and a link to the venue’s site and google maps so we can find it or get directions from google. To display a single card we use the gallery template, showing only one item and use a task to prepare the card data.
To keep our dialogs clean and readable we introduced tasks in BubbleScript. Tasks also run faster than dialogs since they are processed in a different way in Botsquad. They are therefore more suitable for doing more complex and heavier logic like integrating API’s and/or formatting data for displaying and in the same time keep the dialogs concise and readable. A task can be executed simply by using the perform command.
The below example shows a task that prepares a little data structure that can be presented as a card to the user. Since all variables are global within Botsquad, you don’t need to pass any variables for this to work.
task format_poi_card do
  d = poi._match.distance
  branch do
    !d       -> distance = ""
    d > 1000 -> distance = " (#{round(d / 1000)} km)"
    true     -> distance = " (#{round(d)} meter)"
  end

  # format the buttons
  btn1 = [title: "🗺 maps", type: "web_url" , url: @maps_url + poi.name]
  btn2 = [title: "➡️ next", type: "event", event: "next"]

  # determine which buttons to show
  if length(pois) > 0 do
    btns = [btn1, btn2]
  else
    btns = [btn1]
  end

  # format the card
  card = [title:    poi.name + distance,
    subtitle:       poi.description,
    image_url:      poi.image,
    default_action: [type: "web_url", url: poi.url],
    buttons:        btns
  ]
end
Now we can use this task to prepare the card and show it in a dialog:
# show the card
dialog test_card do
  perform format_poi_card
  show gallery_template([card])
end
User intent: What’s next?
As you can see we added a button “next” on the card. This way, the user can trigger the @whatsnext intent not only by typing in for example “what is next” or “continue”, but also use this button. Therefore we will need to write two dialogs, one that is triggered when the user types in a message that matches the @whatsnext intent and one that gets triggered by the on click event of the button. They’ll both invoke the dialog that will actually perform the logic belonging to the @whatsnext skill:
dialog event: "next" do
  invoke show_next_poi
end

dialog trigger: @whatsnext do
  invoke show_next_poi
end

dialog show_next_poi do
  # find and show the next poi
end
We want the user to be able to traverse through the list as long as there are POI’s to show. So somehow we need to take the current POI out of the list of POI’s every time we show one to the user. Let’s put it all together and define the show_next_poi dialog:
dialog show_next_poi do
  # get the first POI and take it out of the list
  poi = first(pois)
  pois = pois - poi

  # prepare and show the card
  perform format_poi_card
  show gallery_template([card])
end
This concludes the implementation of the @whatshere and the @whatsnext intents. The bot will guide us through the city based on our current location and the relative distance from our location to the POI’s that are in our database, which is great right?
We can decide to publish this bot in Facebook Messenger or Telegram, as a standalone web application or even a Progressive Web App so users can actually add this app to their homescreen on their device. I’ll discuss the PWA part in the end of this article, so hold on for now. Let’s implement the @whereis intent first.
User intent: Where is…?
A City Guide in Amsterdam that cannot tell you where Dam Square is would be worthless right? So we need to extend our bot with another user intent, which we’ve introduced in the beginning of this article as the @whereis intent. Remember we implemented this intent as an Entity because we need to extract the search criteria of the POI out if the intent message. Remember we defined it as:
@whereis   entity(match: ["where is #<poi>", "for #<poi>",
  "find #<poi>", "have #<poi>", "are #<poi>", "there #<poi>",
  "where is..."])

dialog trigger: @whereis do
  # find the poi the user is looking for
  say "You are looking for #{entity.poi}"
end
I’ve explained above we can use the score function to score all items in a certain collection against certain criteria. We used our location as the criteria in the @whatshere intent. Now we are going to use the input given by the user in the message to build a query. If the user hasn’t given us any criteria we will ask for them explicitly.
dialog trigger: @whereis do
  if !entity.poi do
    entity = ask "What POI are you looking for?",
      expecting: @whereis + entity(match: "#<poi>"**)**
  end
end
Notice we are extending the entity in the ask with a more generic matcher: entity(match: “#<poi>
"). This way when none of the matchers match, it will consider the complete answer as the entity.
As you noticed in the definition of the YAML file for the POI’s we have two fields that might contain relevant information in our search for the right POI and that is the Name and the Description. So we need to involve these two fields in our query, like below:
  criteria = "Dam Square Amsterdam"
  query = [_or: [name: criteria, description: criteria]]
  pois = score(@pois, query)
  say pois[0].name
This will only work if we type in the exact name or description of the POI, so in this case ‘Dam Square Amsterdam’. If we type in ‘Dam Square’ we will not score any of the POI’s so we will just get the first POI back from the list with a score of 0. We can improve this by doing a regex search:
  criteria = "Dam Square"
  query = [_or: [name: [_regex: criteria], description: [_regex: criteria]]]
  pois = score(@pois, query)
  say pois[0].name
Now, when we search for Dam Square we will find both the POI’s that match Dam Square in their name as well as their Description. Since Dam Square is mentioned in the description of the Royal Palace of Amsterdam as well as in the name of Dam Square Amsterdam we might get the Royal Palace first as a result instead of Dam Square Amsterdam. This can be solved by using weights (w:) and the _or operator. The _or operator is needed to indicate we can match on both so the scores will be cumulated based on the hits in both or either of the fields.
  criteria = "Dam Squere"
  query = []
  query.name        = [_or: [[_regex: criteria, w: 2]]]
  query.description = [_or: [[_regex: criteria, w: 1]]]
  pois = score(@pois, query)
  say pois[0].name
So this improved our results again, until we accidentally made a typo. When we typed in “Dam Squere” for example it wouldn’t score any of the POI’s. For this purpose Botsquad invented the _sim operator which allows for much more fuzzy matching.
The _sim operator matches using the Normalized string similarity, which is calculated by the max of the Normalised Levenshtein distance and Jaro distance.
  criteria = "Dam Squere"
  query = []
  query.name        = [_or: [[_sim: criteria, w: 2]]]
  query.description = [_or: [[_sim: criteria, w: 1]]]
  pois = score(@pois, query)
  say pois[0].name
This worked quite well, until we tried a couple of other criteria and found out it sometimes returns strange results. Results that apparantly look similar for a computer, but not so much for a human being. Like “Museum” translated somehow to “The New Church”?! How can this happen. So without going into too much detail, this calculated distance might calculate the arritmatic similarity, but that doesn’t always translate to humanly recognisable similarity. So let’s bring back the regex matching and apply a higher weight to it but keep the fuzzy matcher as a fall back with a lower weight. This way, the word Museum will still match the Rijksmuseum, Van Gogh Museum, etc.
  criteria = "Museum"
  query = []
  query.name        = [_or: [[_regex: criteria, w: 4],[_sim: criteria, w: 3]]]
  query.description = [_or: [[_regex: criteria, w: 2],[_sim: criteria, w: 1]]]
  pois = score(@pois, query)
  say pois[0].name
This works really well. We could type in quite some fuzzy sentences and the bot would manage it self until we tried: “I’m looking for a nice museum with great art from old dutch painters”. This sentence contains quite some irrelevant words which adds noise to our search criteria, like ‘a’, ‘nice’, ‘with’, ‘great’, ‘from’, etc. All these words will normally be taken into the search and messes up the calculation of the Similarity and/or matching of the regex.
This can be solved in multiple ways. We either use trained sentences as intents for every POI which will explode the bot in terms of intent definitions and training sentences. The other way is to just ignore those frequently used, but for searching less relevant words. We opted for the later as we added a little yaml file (ignore.yaml) with stop words (freely available online) and used it to filter out all words we expect not to be relevant for searching POI’s. The way to do that is to split the search criteria into an Array. Then subtract the words to ignore from this Array and Join it into a single new string again, like this:
  words    = split(entity.poi, " ")
  criteria = join(words - @ignore, " ")
So when we put all this together we can finish our little helper task to build the @whereis query:
task build_query do
  # lets start with an empty query
  query = []

  if entity.poi do
    # let's remove what we don't need
    words    = split(entity.poi, " ")
    criteria = join(words - @ignore, " ")

    # hard matches are considered more relevant then similarity matches
    # matches in the name are considered more relevant than in description
    query.name        = [_or: [[_regex: criteria, w: 4],[_sim: criteria, w: 3]]]
    query.description = [_or: [[_regex: criteria, w: 2],[_sim: criteria, w: 3]]]
  end

  # lets output the query for debugging purposes
  log query
end
Now we can finish the @whereis intent by using this task to build the query and then simply call the show_next_poi dialog for presenting the results. You can check the bot here if you like and make it your own by cloning and extending it.
Be aware that with the minimum data we provided in the YAML file, this bot will still fail from time to time. To solve this you will have to spend more time defining synonyms and keywords for your POI’s to help the bot better match on the search criteria of your users. You could also add the address of the POI’s so you could ask stuff like, where is the museum on this or that street, etc.
Progressive Web Application
So I promised you to explain how you can easily convert this bot into an App that you can install on your home screen of your device. Well simply by adding a little Yaml file to the bot that is called: pwa.yaml and fill it with minimally the following contents:
manifest:
  theme_color: "#006cb3"
  background_color: "#ffffff"
And voila, there is your PWA. Publish the bot again and go to its link, preferably on your phone. You can now go to your browsers menu and choose the ‘Add to homescreen’ or equivalent button to have it registered on your phone.
Good luck trying it and making your own CityGuideBots :-)
If you want talk more about this topic or how to build Chatbots in general, feel free to join us at The Botsquad Facebook Group!